Linux liposuction, or: Xubuntu in under a gig on the Eee PC
Note: If you upgrade to kernel 2.6.29, your compressed partition won’t work. Read Squashing /usr and the 2.6.29 kernel for a guide to upgrading.
I got an Asus Eee PC for Christmas. It’s a black model with 4 GB (i.e. 3.7 GiB) of solid-state disk and 512 MiB of RAM. The specs aren’t particularly high end, obviously, but it’s cheap, small, light, and robust.
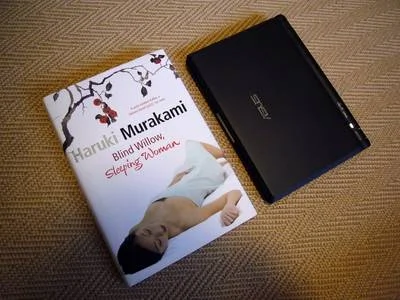
For around £200, you get a little computer with WiFi, a proper (if diminutive) keyboard, and the ability to be stuck in a bag and taken almost anywhere. It’s smaller and lighter than a hardback novel:

Plus, it comes running Linux out of the box! What’s not to like?
To be honest, I looked at the supplied distribution (Xandros) for about five minutes before wiping it and installing my preferred Linux, Ubuntu (in its XFCE variant) on there. I’ve spent the last few days tweaking it to work according to my preferences and optimally within the constraints of the hardware. There’s more to do, but I’m making progress.
As I mentioned, the internal storage is only 3.7 GiB. By default, Ubuntu takes a lot of that for itself, but it can be slimmed down quite drastically. Some of it I freed by removing unneeded packages, like the X11 drivers for graphics cards that I don’t have. Some was released by removing heavyweight software such as OpenOffice.org (I consider word processors actively harmful, but that’s a discussion for another day). Beyond that, though, I’ve delved a little deeper and given the operating system itself a bit of liposuction to take it down to under 1 GiB.
Here’s how.
I ran xdiskusage to find out where the disk space was being used most,
and discovered, to my not very great surprise, that most of it (1.5 GiB)
was taken up by the /usr directory. The obvious solution was to
compress it, using a combination of squashfs and unionfs.
squashfs lets you compress a filesystem, but it’s read-only. unionfs, meanwhile, allows you to overlay a writeable filesystem on top to allow changes to the data. Obviously, the more you change the data, the more disk space is used, but it’s always possible to recompress and recover the space later on.
All the commands I’m going to give here need to be run as root, and I’m going to assume basic Linux competence. If it doesn’t make sense to you, you probably shouldn’t try it!
The first step is to install a couple of packages:
apt-get install squashfs-tools unionfs-tools
Then make a space for your compressed filesystem and overlay:
mkdir -p /.filesystems/usr/overlay
And compress your filesystem:
mksquashfs /usr /.filesystems/usr/usr.sqfs
Add these lines to /etc/modules:
unionfs
squashfs
loop
... and these lines to /etc/fstab:
/.filesystems/usr/usr.sqfs /usr squashfs ro,loop,nodev 0 0
unionfs /usr unionfs nodev,noatime,dirs=/.filesystems/usr/overlay=rw:/usr=ro 0 0
Next, reboot from a live distribution on a USB stick, CD, or SD card,
mount the internal root partition, and move aside the old /usr
directory:
mkdir /mnt/sda1
mount /dev/sda1 /mnt/sda1
mv /mnt/sda1/usr /mnt/sda1/usr.old
mkdir /mnt/sda1/usr
Reboot from the internal disk. Did it work? Then you can remove the
/usr.old directory to reclaim the space.
After all that, my operating system takes only 832 MiB on disk, saving me about a gigabyte. That’s a significant improvement when there’s only 3.7 GiB to start with!
In a comment, Passerby explained how to do this without rebooting into a live system:
Switch to runlevel 1:
init 1(Ubuntu will prompt you what to do – choose opening a root shell)
Move aside the old
/usrdirectory:mv /usr /usr.oldTest whether you previously edited fstab successfully by typing:
mount -aIf you get error messages or your
/usrdirectory shows up empty, either fix yourfstabor undo the changes before rebooting.Instead of the final reboot, you could also just return to runlevel 3 via:
init 3